Yesterday was all about cars. Roger and I spent the better part of the day test-driving, which meant actually dealing with car lot sales people. That's always a risky enterprise. Some are just so hard to get away from.
But the day was a success. We narrowed the field down to one option, the Acura MDX, and I'm totally in love with it (in the way women love a car, but not in that way men love cars.) Here it is, in the very color we've chosen, known as Desert Rock Metallic.
I know, it probably doesn't seem glamorous. But when what would really work is a mini-van, and I simply refuse to drive a minivan (it's a gut reaction thing to those sliding doors, I think), this is a pretty fancy option (hence the "primp" thing above!). This is sort of a cross-over between an SUV and a luxurious station wagon, with a decent third-row seat for when I drive my quilting friends to bay area quilt shows or haul various kids on field trips.
Hey, Pat--this "way back" isn't as "way back" as my current car!
And look at that sunroof! I haven't had a sunroof since I was a footloose, child-free working woman.
It was an exhausting day. It started when a fairly manic woman at the Mercury dealership took us out for a test-drive in a Mountaineer (a fancied up Explorer) and the battery died, leaving us stranded and requiring that someone else come from the dealership come rescue us. Roger and I had a few panicky moments when we were trapped in the car, waiting for rescue, while the lady took the opportunity to give us a tour of the vehicle's interior features. Yikes! We weren't impressed by the car to begin with, and couldn't get out of that dealership fast enough once we were finally retrieved by another salesperson (driving a Hyundai, no less).
Then, we came home and I spent the late afternoon and evening talking my dear salesmen friends at dealerships within a 150 mile radius. What's a 2-hour drive to pick up the car if you can save $50 per month on the car payment?! By the time the wheelin' and dealin' was done, I was feeling empowered and exhausted. Turns out our local dealer was willing to match the best deal, so I'm headed there today to sign the papers. Gotta get those "end of the month" papers done to get the best deals, I guess.
But I'm thrilled. Ooh, and I did I mention that this has heated seats in the front? Highly useful here in California (!), but a thrill nonetheless.
Saturday, September 30, 2006
Thursday, September 28, 2006
Bits and Pieces
Yesterday I enjoyed a visit with my newly-formed art quilt minigroup. We met at Pat's house, and had a lovely time playing show-and-tell, swapping books and enjoying general chatter. We keep the pressure low by brown-bagging lunch, so one has to sweat any big lunch preparation. It's very enjoyable.
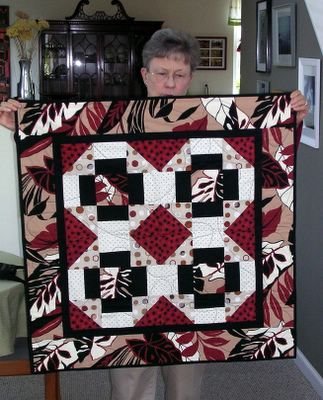
Here is Ann, showing her latest quilt. She made this quilt in response to an assignment to work with "bold" as a theme. Isn't this fabulous?
I'm not sure if you can tell, but Ann used oval templates to quilt different sized ovals all over this. The curvy quilting lines really compliment this design beautifully, I think. As always, I am so impressed by Ann's fabulous fabric choices.
It was especially nice to sit down with Ann, Pat, and Cathy and talk quilts and art. I've been so scattered with work and house-repair and shopping for carpet to replace our glass-filled one. And now that my car is almost repaired (I get it back tomorrow after the body work repairs and detailing), I'm shopping for a new one. Somehow, this vandalism thing feels like the ultimate in bad car-ma and it's time to replace it (and it was time before this happened, anyway).
Tomorrow, test driving.
Sunday, September 24, 2006
Just call me Sam Spade
I've spent Friday and Saturday playing detective. It's tedious but surprisingly satisfying work.
The issue: Defendant A (whose product severely injured our client by falling on him and crushing his legs) claims that it never did business in the plaintiff's state and can't be sued there.
My mission: wade through several cd roms full of Defendant A's business records to find evidence that it actually did do business in the plaintiff's state, then prepare the papers to submit to Court to demonstrate that it can fairly and constitutionally exercise jurisdiction over Defendant A.
Fascinating, eh?
Strangely, though, it has been. And maybe it's a weird quirk in my character, but I actually enjoy this sort of work. I've scanned hundreds of invoices and contracts and memos and letters, and darned if I didn't find a whole batch of invoices showing that Defendant A has several regular suppliers in the key state. It orders thousands and thousands of dollars worth of materials every month from that state and has done for years.
Bingo.
I tell you, it's actually fun to write the pleadings. You know, pointing out how, when the defendant's lawyers said "Defendant A has NEVER done business in the state" they, um, just overlooked the years of weekly orders for supplies all coming from that state?
And now that my stake-out is over I can put away my binoculars and get back to my quilt.
Friday, September 22, 2006
Comfort sewing
We are now over 2 weeks post-vandalism and I am still dealing with it on a daily basis. We now have living room windows again (instead of plywood boards) but we are waiting on screens. We have ordered new couches (the fabric is called "passion chocolate!") and next week I'll deal with the rug. My car is drivable with new windows, but next week it goes back to the shop for a new mirror and repair of other body damage. I'm sure that the young fellows who did this had no idea of the amount of damage they were inflicting.
Meanwhile, though, life goes on. I've gotten back to work and have gotten a few big projects done, which has felt satisfying. Roger and Caroline are happily back at school. Things are feeling pretty normal again.
When I've had time, I've even managed some sewing time. I'm working on my art group's "muslin challenge" with fun results -- no pictures yet, so as not so spoil the end surprise. And when I've been overwhelmed by the fall-out from the vandalism, I've retreated to my office for some comfort sewing.
This week, I've hauled out my scraps and am putting together another quilt to donate to the Valley of the Moon Children's Shelter. With the vague sense of unease we've had here, I've been thinking of kids uprooted from their homes as the result of tragedy, which is the population served by this shelter. The VOM shelter is an emergency custody shelter, where kids are brought when they're taken out of dire circumstances or on their way to foster homes. I love that each child coming into the shelter gets to choose a quilt from the quilt cupboard (many of which are made by my guild members). The quilts stay on their beds while they're at the shelter, and then they get to take them with them when they leave. For many of the kids, it's the only possession that is absolutely "theirs" which follows them into their new lives.
This time, I've been using scraps that I've cut into strips for various strippy projects. They're sorted into lights and darks and stored in these handy bags. (Don't you love these new humongous ziploc bags?)
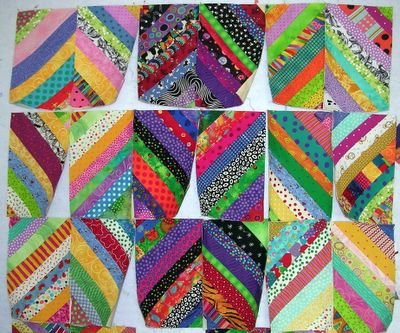
I'm using paper foundations (about 7 x 11") to make diagonally striped scrappy blocks. Very fun, mindless sewing.
And here's how it's looking so far.
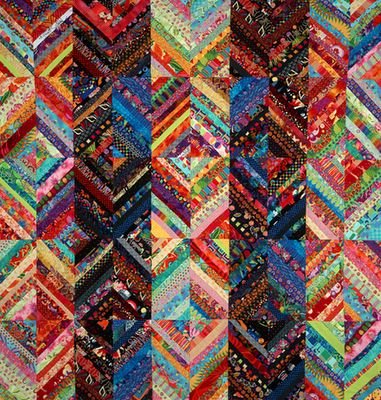
I'm aiming for something like this wonderful Tiramisu quilt by the Pie in the Sky folks.
Tuesday, September 19, 2006
Sound the trumpet!
Caroline came bouncing out of her classroom this afternoon. Today was the first band lesson and she has elected to learn the trumpet. She is thrilled.
As luck would have it, I bought the giant sized bottle of Advil at Costco yesterday, so we are prepared.
Saturday, September 16, 2006
Show time
Friday, September 15, 2006
Really good reading
Tommy is compiling a list of people's favorite books so that she can create a "must read" list for herself and others. Being a voracious reader, as well as a keeper of lists of what I've read, I turned to my trusty notebook and started to list my favorites.
Well, it became apparent that my list is pretty long. So, I'll post it here and Tommy -- and you -- can pick and choose if you're looking for something good to read.
When my sister and I were kids, we developed funny rules about the books we'd get from the library. (Why, I don't know, but we did.) We'd stack our books in the order we intended to read them as we rode home from the library, and we'd HAVE to read them in that order. No switching. (See? What difference could that have made?) Then, we kept journals in which we rated the books on a scale of 1 to 10. We both still do this. It's weird, but it's useful for looking back to see if I actually did read something before.
So, here's my list of what I've given ratings of 9 or 10 to within the last few years. (I'm including the Amazon.com link so you can go see what it's about... but try your local library for it first!)
Simply great fiction
Blue Diary - Alice Hoffman
Empire Falls - Richard Russo
The Last Days of Summer by Steve Kluger
Perfect Match, Plain Truth, Keeping Faith, Vanishing Acts -- and anything else by Jodi Picoult
The Deptford Trilogy - Robertson Davies
The Dive from Clauson's Pier - Ann Packer
The Seduction of Water - Carol Goodman
The Sabbathday River - Jean Korelitz
The Secret Life of Bees - Sue Monk Kidd
The Emporer of Ocean Park - Steven Carter
Midwives, The Law of Similars - Chris Bohjalian
The Lovely Bones - Alice Sebold
gods in Alabama - Joshilyn Jackson
Three Junes - Julia Glass
Poisonwood Bible - Barbara Kingsolver
Beachcombing for a Shipwrecked God, Pocketful of Names - Joe Coomer
Fun chick lit
Lucy Sullivan is Getting Married, Angels and anything else by Marian Keyes
Eat Cake - Jeanne Ray
Sleeping with Shubert - Bonnie Marson
The Wilder Sisters - Joann Mapson
Well-written relationship themes
Bread Alone by Judith Hendricks
Almost by Elizabeth Benedict
Never Change, True to Form, The Art of Mending, and anything else by Elizabeth Berg
I Wish I had a Red Dress and What Looks Like Crazy on an Ordinary Day - Pearl Cleage
High Water - Lynn Hightower
Sweetwater Creek, Islands, others by Anne Rivers Siddons
Absorbing British novels
Picking up the Pieces - Mary Sheepshanks
The End of an Error - Mameve Medwed
Caught in the Light and anything else by Robert Goddard
Legal/political thrillers
Open and Shut, Sudden Death - David Rosenfelt
The Incumbent - Brian McGrory
The Lincoln Lawyer - Michael Connolly
Mysteries
An American Killing, Love her Madly - Mary Ann Tirone Smith
Flashpoint - Lynn Hightower
Reliable Sources, Ecstacy, and others by Beth Saulnier
Falling Off Air - Catherine Sampson
Time Travel
Time and Again - Jack Finney
Thursday, September 14, 2006
Beginnings and Endings
I asked in my last post about how to begin and end quilting neatly, and got some helpful replies.
I know some folks feel that the back doesn't matter, it's all about what's on the front. I agree with that maybe 75%...which is to say that I don't worry much about how the back looks, and in fact I typically put a big splashy print on the back so the details of my quilting aren't quite so obvious.
But the 25% of disagreement comes from several thoughts. First, I make quilts. Sometimes art pieces, sometimes bed quilts, some contemporary, some more traditional. And for me, good technique is part of what I'm striving for. It's not the only thing, and it's not the biggest thing. But I'm proud to be part of a quilting tradition, and I have no quarrel with the expectation that the work be well-presented on both sides. Plus, I know that there've been plenty of times where I've seen a striking piece (whether it's an art quilt or something more traditional) at a show, where the design is really good and the color is effective...and the closer I get, the more disappointed I am at the really sloppy technique. (I'm not saying here that I don't like raw edges and wonky bits and nonpointy points.) But maybe this is for another discussion.
Anyway. I don't like the fact that my not knowing how to do this seemingly simple thing gets in my way. So, I"m trying to figure it out so I can move past being impeded by this.
Okay. On the free motion quilting, here's what I've been doing with great success. I take one stitch (really, just roll the needle down and then up again), then pull on the upper thread tail until the loop from the bobbin thread comes up, and then pull the bobbin thread to the top. Then, holding both threads out of the way, I stitch once or twice in that same place, then stitch forward a ways, stop, and cut off both thread tails.
For stopping, I do what I Ricky Timms shows on his DVD... As you slow to a stop, you end with a few teeny stitches, then raise the presser foot and needle, pull the fabric a few inches away so you can catch the upper thread, then keeping the upper thread looped around your left index finger, you bring the needle down once in the same place where it came up... Again, raise the needle and presser foot, pull the fabric away a few inches, and pull up on the loop around your finger. It pulls the bobbin thread up to the front and you can snip both off. Everything is secured by those teeny stitches you took just as you were stopping, but it's not visible because you're not stitching over other stitching.
But as for the straight stitching, not free motion? Here's where I've not perfected a method. I've tried starting, stitching a stitch or two then back stitching for a stitch and moving forward again, but my Bernina always does two back stitches when I wanted one, and I see a heavier mark where the stitches were back-stitched over. It looks clumsy to me.
I've tried just starting and going forward (thinking to tie the threads or bury them later), but what tends to happen is that I end up getting the threads tangled in or sewn in by what i'm doing, and that makes a mess that is hard to totally erase later.
So, here's what I'm trying now when I'm quilting with feeddogs up and a walking foot or other regular foot on. I pull up the bobbin thread with one needle insertion, as described above, then I set the stitch length to almost 0 and take a few really teeny stitches but still moving forward and not in the same place so as not to get a little blob on the back...then I increase the stitch length to normal and go on my way. I can cut the thread tails off and it's secured. I reverse the process for stopping.
So far, this seems to be working well but I have to think about it...it's not automatic.
And really, when I quilt on my Juki, I tend to use the thread-cutter button on the foot pedal, which cuts when you want it to and leaves a tiny 1/4" tail on the back. The only problem with that is that it's not so fun to go find all those teeny tails to snip them off, but it sure makes for quick quilting.
If anyone has any other suggestions, I'd be happy to hear them. This is one of those things I'm sorta paying attention to right now, as I'm trying to do more visible quilting, dark thread on light fabric, and fully allowing the quilting to show on back. I'll see how it goes.
Wednesday, September 13, 2006
Round and round
Today, while the auto glass guy was here whacking the rest of the glass out of the car windows and replacing it with nice, new windows, I was upstairs engaging in frustration-release therapy.
I put on my Hawaiian music playlist on Itunes, and engaged in some intense free-motion quilting. I had a very good time and feel much better.
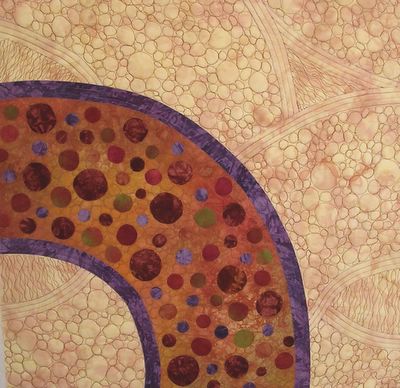
My goal for this little impromptu piece was to play with a design that left a lot of space for quilting, and to make the quilting an equal design element of the whole. I think this is somewhat successful in that, not perfect (snort) but it was a fun try. I'm not sure what the final binding will be. It'll finish to about 24 x 24".
One of my ongoing challenges is how to stop and start fmq without the threads balling up and looking horrid at those stop/start points. I used the method Ricky Timms demonstrates on his Grand Finale dvd (I know, enough already, right?) and it definitely works on the FMQ parts. I still see globs where I was using a walking foot. Any good advice for stops and starts when you're using regular stitch length and feed dogs up?
Tuesday, September 12, 2006
Experimenting
As I tend to do every now and again, I've been pondering my tendency to wander from project to project, technique to technique, experiment to experiment. As I read blogs and see art produced by folks who have honed in on What They Do Best and who have the time and focus to actually work in a straight-ish line, I tend to get discouraged about my own rambling.
But recently I picked up the lastest issue of Teesha Moore's fun 'zine "Art and Life," and found a reference to an article on creativity that intrigued (and encouraged) me. So, I went and looked it up, and was intrigued.
The article is by Daniel Pink in an online issue of Wired Magazine, called "What Kind of Genius Are You?" In it, Pink discusses a theory developed by economist David Galenson that there are two types of creative people. The first, "the conceptual innovator," flashes out with genius work early in life. The conceptualists (under his theory) are dramatic and quick, and figure out in advance what they are doing and where they are going creativity-wise. The idea is the thing, not so much the execution. The definitive aspect of a conceptualist is certainty: they know what they want and they know when they have created it. They have a clear idea of what they want to achieve, specific goals. Into this category Galenson puts F. Scott Fitzgerald, Pablo Picasso and Orson Welles.
In contrast, the second type of creative person, the "experimental innovator," goes through years of trial and error before doing important work in his/her later years. Their work is usually not conceived fully in advance. They figure things out as they go along, and never really know when their work is finished. In this category, Galenson lists Cezanne, Mark Twain, and Alfred Hitchcock.
Interestingly, Galenson reports (in his analysis of artists based on this theory) that conceptualists always sign their work, while experimentalists rarely do.
Intriguing, yes? Maybe it's just me, but it makes me feel better about all my wanderings.
Monday, September 11, 2006
Going round in circles
I think we are all in stress-recovery mode around here. Roger has the flu, and spent the weekend in bed. Caroline just wanted to stay home to draw and play Pokemon and rearrange her horses and watch movies with her friends Lily and Selena.
Me, I retreated to my office for an afternoon of therapeutic fusing. Here's the result, as yet unsewn. It was inspired by a photo of a garden walkway I found in some gardening magazine. I'm looking forward to quilting it and may even (gasp) apply a few beads.
Sunday, September 10, 2006
Check out the sidebar...
We're getting back to normalcy around here, if you ignore the huge pieces of plywood still boarded up on the outside of the house over the living room windows. From the inside, with the roman shades down, things look pretty normal. And our insurance is telling us not only that we need to replace the living room carpet but also that we either need to reupholster the furniture that got all that glass on it OR replace those pieces (whichever is cheaper, of course). So, looks like a living room make-over will come out of this mess. That's a rather nice silver lining!
Anyway. I've placed a link in my sidebar to the list of Artful Quilting Tutorials I've found, and will continue to update that entry. So, if you're looking for a quick lesson or an avenue to a new experience, explore that! I've just added PamDora's wonderful slide show of how her current piece went from fabric clumps to almost-final.
Thursday, September 07, 2006
Picking up the pieces...
First of all, THANK YOU to all of you who sent sympathetic thoughts and cheering words of support about the vandalism we've suffered. It is a huge hassle, but the scariness has receded and we are being treated well by our insurance carriers. Caroline is coping really, really well, and we are spending a lot of time just hanging out together and talking about how important we are to each other and how, really, the only thing that matters is that we're all okay. The rest is just STUFF. So, I'm astonished at how far-reaching the actual consequences of this incident will be (we have to have our living room rug replaced, due to too much glass embedded in it to ever fully remove, for example) but, as I said, that's just STUFF. And I was very glad to hear from the police this morning that there have been a few other similar incidents and they are pretty certain they know who did this and they will be in touch soon to give us more info.
Anyway. On to quilting content!
I mentioned a few weeks ago that I watched Ricky Tims' DVD "Grand Finale," in which he shows various quilting and finishing techniques. I was taken with a binding technique he shows there, where you end up with a really tidy bit of piping in the binding. So, on Tuesday I decided to get my "Green Fields" quilt finished.
First, I sewed some #3 perle cotton into a strip of fabric for the piping, using a pintuck presser foot. The pin tuck foot has grooves that slide right over the cord and keep it snug while you sew it in place. Very easy.
Then, I sewed the piping down the middle of the actual binding strip. You can see I set up a masking tape guide to make sure I was keeping the strip even. Again, using that pin tuck foot really helped to keep that piping sliding right in place.
I pressed the strip, wrong sides together, and voila! I had binding ready to go with piping inserted.
Then, I lined up the edge of the binding with the edge of the quilt, and sewed the binding on to the BACK side of the quilt.
And here was the coolest part: I used a edge stitch foot to sew the binding to the front of the quilt. This special foot has a metal rudder like thingie that slots right into the groove you want to sew into...so it guides you along and the needle follows, sewing perfectly into the groove. I'm not big on "in the ditch" stitching, but if I were gonna do it, this is the foot I'd use.
The result of this method is that the binding gets machine-sewn to the quilt, so it's very sturdy. And the stitching line is hidden between the piping and the binding, so it looks exceptionally neat. On the dvd, Timms shows how to do mitered corners so they work beautifully, too.
And here's the result:
Cool, huh? I am very impressed with myself.
I don't expect that I'll do this on many quilts, but I really like it on this one and was pleased to work through his well-demonstrated technique.
Maybe tomorrow I'll get to play with fusing, as I've been dying to do...
Wednesday, September 06, 2006
Shattered
I had this plan for today. I was going to get up, and post a new entry with pictures of the quilt stuff I did yesterday, then I had a pleasant day ahead of some fusing play time.
Instead, I went downstairs at 6:30 am to find glass all over the living room. Somehow, during the night someone took a huge blunt object to our two living room windows and shattered them. Weirdly, Roger and I had awakened during the night to a loud noise, but Roger saw nothing when he went downstairs to investigate (probably because the living room blinds were down and he couldn't see that the windows had broken). I looked out the bedroom window (which faces the front of the house) and didn't see anything.
What a shock. And then, when I went outside to see the damage from the front, I saw that TWO windows on my car had been shattered as well.
So, the morning has been spent with local police and insurance reps and a lot of time shop-vacking glass. Roger had to rush off to school for a class but he will be back as soon as he can.
I've taken pictures for insurance purposes but am too disheartened to post them here. You all don't want to see such ugliness, anyway.
A neighbor who opened her door when she heard noise, saw two adolescent boys running around the corner (our house is on a corner). The police thinks it may have been aimed at a school principal who lives on a corner in the same position as our house but on the next block over. All that rage, and they hit the wrong house? It's sort of a relief to think that it was kids, rather than grown-ups....but still, it has me thinking. Was this aimed at us specifically for any reason? Why hit MY car and not touch Roger's which was parked right next to it? My Ipod was in the car (although tucked out of sight) and my cell phone was clearly visible looking in...those weren' taken. So it WAS about the damage, not about theft. And if it was mistaken identify, will it happen again?
My tough, street-wise urban transplant neighbor says he will be watching all street traffic today for me, as he thinks that anyone who did that would come back to see what they accomplished by the light of day. He says he's ready to jump in his car and follow them. Great. I'm not sure I'm comforted by this.
I'm going to go take some advil, then take a shower, and then...well, wait for the restoration guys that the homeowners' insurance company is sending over.
I think this calls for chocolate. Is it too early for a margarita?
Monday, September 04, 2006
Art Quilt University, right here!
Feeling down because you can’t spend weeks with Nancy Crow in her barn, attend Art Quilt Tahoe, or cruise the Mediterranean with a boat-load of quilters?
Never mind. You have the Artful Quilters Blog Ring at your disposal! And, thanks to the talent and generosity of various ring members, we have our own workshop series right here. Through the wonder of the internet, these wonderful artists appear in your own home and show you how they do what they do. And, what’s more, you can participate while wearing your comfiest jammies, at midnight or with toddlers watching Sesame Street on the other side of the room.
I’ll try to add to this list as I learn of new tutorials posted by blog members–and I hope you’ll email me with additions as you find them. I’m sure there are others on blogs that I’ve forgotten or never found in the first place. But here’s a starting point for a lot of artistic exploration. Thanks to all of the very generous artists who continue to share their processes with all of us!
Design Process
It's Only a Leaf slideshow with Pam RuBert
The Weaver with Terry Grant
Part 1, Part 2, Part 3
Fabric Coloring
Fabric Dying
with Melody Johnson ("The Lazy Dyer")
more with Melody Johnson (dye colors)
Dying Gradations
with Tommy Fitzsimmons
Fabric Painting
with Sonji Hunt
more with Sonji Hunt
with Alma Stoller
Fabric Printing
Tips from Diane Rusin Doran
Finishing Techniques
Basting a Quilt Top with Lisa Call
Escape Hatch Finish with Melody Johnson
Grommetization with Sonji Hunt
Fusing
Fusing
With Melody Johnson
more with Melody Johnson
Fusing Components
with Pam RuBert
Fusing with Liquifuse
with Terry Grant
Fusing the quilt top
with Melody Johnson
Miscellaneous
Assembly line small quilts with Deborah Boschert
Fabric Postcards with Deb Richardson
Oddball Charms and Beads with Alma Stoller
Tracing a Photograph with Electric Quilt 5 with Jan T.
Sewing Stuff
Block Construction
with Tommy Fitzsimmons
Random Sewing
with Alma Stoller
Cool Handbags
The Square Bag with Kristin LaFlamme
SuBe Sac "The Sweet Bag" with Kristin LaFlamme
Blog-related
Creating a Blog Banner
with Brenda Smith
Sunday, September 03, 2006
Tutorials, anyone?
There is so much talent on this ring, and such incredible sharing.
To celebrate that, I'm making a list of the great art quilty tutorials available among the ring members which I'll post here in the next few days. I've found quite a few, but I'm sure I'm missing some and I don't want to leave anything out!
SO-- If you have a tutorial or lesson or series of posts about how you went from idea to finished quilt (with photos), or if you know of any on an AQ ring blog, email me with the links and I will add it to my COMPENDIUM of INFORMATIVE TUTORIALS for all to share.
We are SO talented.