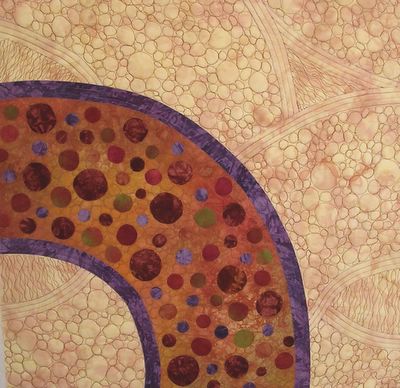
Today, while the auto glass guy was here whacking the rest of the glass out of the car windows and replacing it with nice, new windows, I was upstairs engaging in frustration-release therapy.
I put on my Hawaiian music playlist on Itunes, and engaged in some intense free-motion quilting. I had a very good time and feel much better.
My goal for this little impromptu piece was to play with a design that left a lot of space for quilting, and to make the quilting an equal design element of the whole. I think this is somewhat successful in that, not perfect (snort) but it was a fun try. I'm not sure what the final binding will be. It'll finish to about 24 x 24".
One of my ongoing challenges is how to stop and start fmq without the threads balling up and looking horrid at those stop/start points. I used the method Ricky Timms demonstrates on his Grand Finale dvd (I know, enough already, right?) and it definitely works on the FMQ parts. I still see globs where I was using a walking foot. Any good advice for stops and starts when you're using regular stitch length and feed dogs up?

I like the texture that you have achieved here Diane. As to stopping/starting, FMMQ or otherwise, I prefer to leave long tails and sew them in later. It's a mindless task that I can do while watching TV with David.
ReplyDeleteLooks great. What is the method for stopping FMQ without balling??? Please?? For the normal straight stitching, an option is to go back and forward 1-2 stitches. But only when it doesn't show too much.
ReplyDeleteI do as Brenda does -- leave tails and knot them when done, then bury them in the quilt later. A Self threading needle is very handy for this. My binding vote is something brought 'round to the back, or the same color as the background so as not to distract from all the round pebbly fun.
ReplyDeleteYou really did an excellent job of quilting this piece. It has so much texture and movement to it. Makes me want to take a stroll through it.
ReplyDeleteWho cares about the back? The ART is on the front.
ReplyDeleteMrs. Mel beat me to that comment!!
ReplyDeleteThis is a beautiful piece, and your quilting is great. As someone who doesn't know what she is doing, I feel silly offering advice, but here is what I try to do. Always pull up the bobbin thread. I begin and end by sewing shorter stitches. Cut the thread very close to where you sewed it, as soon as you get a chance, so you can avoid sewing over any loose threads. The other thing you can do is just make the thread globs part of your design element.
ReplyDeleteP.S. I looked and looked at your picture and don't see any thread globs.
Oh wow! That works so well. I love the pebbly quilting, it is something I struggle with. I hope one day I can make mine look like that. Fantastic quilt.
ReplyDeleteWow, great quilting! It really ties in well with the fused design. I find that the thinner the thread I use, the less problem I have with little balls on the back. Of course, sometimes a thin thread isn't what we want - in that case I'd use something like Bottom Line for the bobbin.
ReplyDeleteI have Hawaiian music on my iPod too. Got into it an at old graphic design job. We'd play it on especially busy days to keep the 3 of us calm. There's a happiness to it that was comforting.
ReplyDelete